TweetMyPC is a free utility for Windows that enables you to remotely control your computer via SMS. How it can be done? well let us quickly come to the procedure.
First of all you can download TweetMyPC(V 2, the latest version) free from Download TweetMyPC. Once you download TweetMyPC, double click on setup.exe to install the application. Its just a matter of clicking ‘Next’ few times.This application requires .NET 3.5 or higher installed on your system. Below is TweetMyPC’s screen :
Now, you have installed TweetMyPC on your system and ready to use it. Following are the steps :
1) Create a Twitter account(say ControlMyPC, this is just an example and you need to create your own account) on www.Twitter.comdedicated for your PC. This is because TweetMyPC only responds for updates. This account will be used by TweetMyPC to receive the tweets and act upon them.
2) Configure account ControlMyPC to receive updates from your mobile. For this you can take a look at my earlier post Send updates to your Twitter account by using your mobile.
3) Double click on TweetMyPC icon on the desktop and provide you twitter log-on details. Then ‘Save and close’.Wait for some time for the application to verify your login details.
4) Once your log-on details are verified, you can send commands like shutdown, log-off, Restart, lock workstation, etc through your mobile to your twitter account and TweetMyPC will act accordingly.
Caution : If you are using Windows Vista(32 bit) then you may encounter an error regarding un handled exception when you click on’Save and close’. To avoid this, just run the TweetMyPC.exe file as administrator.
Below are some commands that can be used in latest version 2 of TweetMyPC. Commands are not case sensitive.
1) Shutdown:For shutting your pc.
2) Restart:For restarting your pc.
3) Logoff :For logging off your pc.
4) Lock:For locking your pc.
5) Hibernate: For hibernating your pc.
6) Screenshot : Enables you to find out what is happening on your pc when you are not around. It takes a screenshot of your desktop and sends it to Twitpic.
7) Getprocesslist : On reading this command, TweetMyPC will create a list of all the running process and email the same to the Gmail id which you have mentioned on its screen.
8 ) Getfile
9) Custom commands: This is the most exciting feature which is present in latest TweetMyPC V2. It was not there in version 1. This feature allows you to create your own commands. Just go to menu option ‘Settings’ –> ‘Commands’. Below is a screen shot. You can create a command like WMPLAYER and select wmplayer.exe in ‘Select file’. So, whenever you send WMPLAYER through SMS,window media players will start in your pc. I am using Windows Vista Home Premium and unfortunately this functionality is not working for me :( . As soon as I click on ‘Add command’ after selecting an exe file, it throws an error message ‘Unable to open database file. Please try again.’. I’ll dig in further and try to search for solution of this problem.
Still, other more useful commands are working fine and I am happy about it :)
In the end I would say that it is a superb utility and a must have for all of us.
That’s it for now friends.

BatteryCare is a software to optimize usage and performance of your laptop’s battery. It monitors the battery discharge cycles and helps increasing its autonomy and improving its lifetime.
Following are the features :
1) Battery’s discharge cycles monitoring : The advanced algorithm accurately records when a complete discharge cycle is performed. When the configured number of discharge cycles is reached, a notification balloon pops up to remind that a full discharge is required.
2) Complete battery information : It calculates the statistical remaining time in laptops that don’t support the battery time left information and only list the charge percentage. Shows all the detailed information about the battery, such as wear level, capacities, consumption, manufacturer, etc.
3) Notification area information : In battery mode, the notification icon shows the remaining time and percentage of battery.
4) Automatic power plans switching : Depending on the power source of the computer, BatteryCare can automatically select the power plan you prefer.
5) Control over Windows Aero and demanding Services : Automatically disable the graphics accelerated theme in Windows Vista and/or demanding services that degrade battery lifetime. Once the laptop stops running on batteries, the theme is re-enabled and the stopped services are restored. Just click on ‘Option’ on the top left corner of BatteryCare window. Below is the screen shot.
6) Auto-updates : No need to trouble in downloading new installers, when a new version is available, the program updates itself.
7) Lightweight in the system : Given the concern about the battery optimization, BatteryCare does not interfere with the system performance. It requires only a mere 0,1% of Processor and Memory resources.

Defragging individual file(s)! Well it is possible to defrag single or multiple files by using free utility called Defraggler. Defraggler enables you to quickly and simply defrag the files you want to, without having to process the whole drive. Simply run it, select the file and defragment in seconds. No more struggling with the Windows defragmentation tool!
You can download Defraggler from Download Defraggler. After download it is just a matter of clicking a few ‘OK’ and ‘Next’ to install the tool. The tool supports Windows 2000, 2003, XP and Vista(32 and 64 bit) and both NTFS and FAT32 file systems.
Once you install Defraggler, it is quite easy to use.
1) Just double click on the icon present on your desktop and following screen will appear :
2) Now select any of the drive and click ‘Analyze’. It doesn’t take much time to analyze. My C drive is 30GB and it took Defraggler a few seconds to analyze it.
3) Afterwards click on ‘File list’ tab to view fragmented files. Now you can select a single or multiple files and click ‘Defrag checked’. This will do the job.
You can also check a drive for errors and defrag free space via Menu option ‘Actions’–>’Advanced’.

Friends, now a days word Google is synonymous to word search engine. I think this will soon become official and would be included in dictionary :) .
Now coming to our topic. well, you all must be using Google a lot for your daily search about various topics. Today, I am writing about how to make your search results more relevant and streamlined. You just need to need take care of below points to achieve good results.
1) Use operators in your search terms : These are some symbols which if included in your search term would give you very good results. Below are some examples. Operators are in blue colour.
Search term Find pages containing
Computer Virus the words Computer and Virus
Computer OR Virus either of the word Computer or Virus
“tech2know mobile phone” the exact phrase tech2know mobile phone
There are a number of operators. You can take a look at all of then in Google cheat sheet.
2) Use Advanced image search to find wallpapers which are exactly of the size of your desktop : At times you want to search for wallpapers for your desktop but the resulting wallpapers doesn’t fit on your desktop. Well, solution is already mentioned in this points heading. The procedure is also quite simple.
Go to http://images.google.com –> Click on ‘Advanced image search’ –> Click on ‘Use my desktop size’.
3) Use Google Squared to get results in a grid or spread sheet format : Take a look at Google Squared for more information.
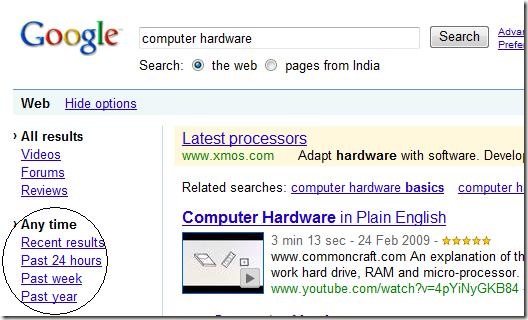
4) Use Any time option to find pages according to time when they were published : Sometimes you search for a term and are more interested in the pages, say that were published in the past 24 hours or past week. So, just use this option. Below are screen shots.
Here I have searched for ‘term ‘Computer hardware’.
*On the search result page, click on ‘Show options’.
*Afterwards you can choose specific pages which were published in Past 24 hours, Past week or Past year.
Thats it for now.

This tool pretty useful for recovering data. DiskDigger can recover files from any type of media that your computer can read. This includes USB flash drives, memory cards(SD, Compact Flash, Memory Stick, etc), and of course your hard drive.The types of files that it recovers include photos, videos, music, documents, and many other formats.
DiskDigger can even scan reformatted or badly formatted disks(disks to which Windows can’t assign a drive letter), and even disks with bad sectors. It bypasses the Windows file system drivers and scans your disk directly. It has its own built-in support for the following file systems: FAT12 (floppy disks), FAT16 (older memory cards), FAT32 (newer memory cards and hard disks), NTFS (newer hard disks), and exFAT (Microsoft’s new successor to FAT32).
DiskDigger is also very compact and portable. The entire program is a stand alone executable file that you can run from anywhere. There’s nothing to “install,” and the program doesn’t leave any trace of having been run.
You can download DiskDigger free from Download Diskdigger. It’ll be downloaded in zip format.
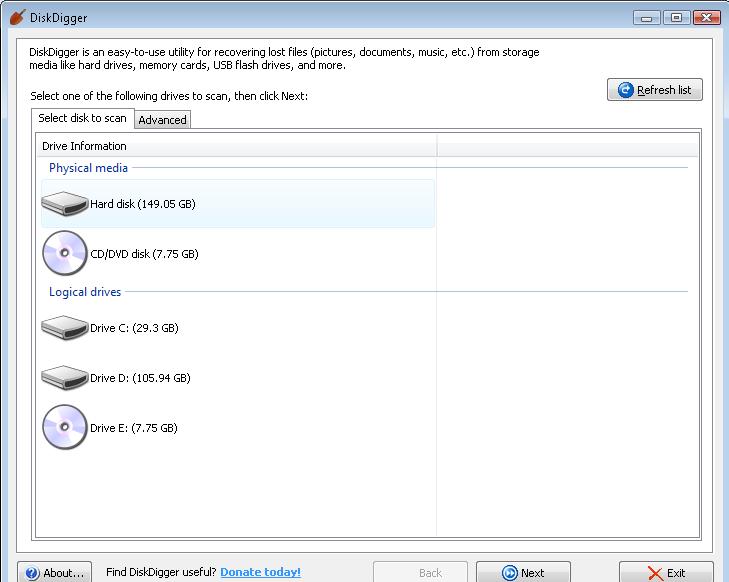
1)Once you download DiskDigger, unzip it and double click on DiskDigger.exe. Following screen will appear.
2) Select any drive, say drive D, by clicking on it and click ‘Next’.
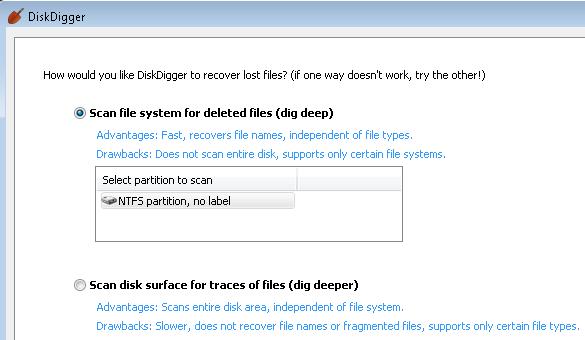
3) Clicking ‘Next’ in above step will result in below screen where you can choose the way you want DiskDigger to search for files.
Scan the file system for deleted files (dig deep) : This scans the file system that is present on your media, searching for deleted file entries. Supported file systems are FAT12, FAT16, FAT32, exFAT, and NTFS. The advantages of this are:
- Very fast
- Recovers all file types
- Recovers file names
And the disadvantages are:
- Doesn’t support all possible file systems (see above for supported file systems)
- Doesn’t scan entire disk (only scans what the file system is aware of)
Scan the disk surface for traces of lost files (dig deeper). This thoroughly scans every sector of your media, searching for traces of known file types. The advantages of this are:
- Scans entire disk
- Goes underneath the file system, therefore independent of file system
And the disadvantages are:
- Slower (sometimes much slower) than the first method
- Doesn’t recover file names or fragmented files
- Only supports certain file types
- Finds ‘existing’ files as well as deleted files
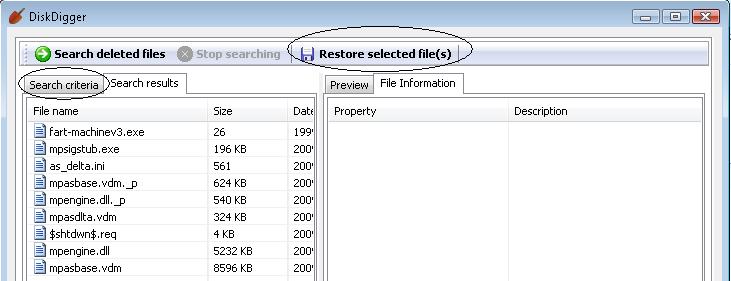
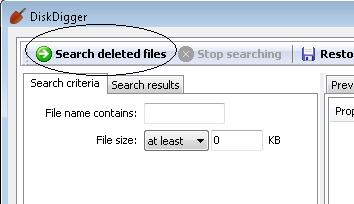
4) Select one of the above options(dig deep or dig deeper) and click on ‘Next’. DiskDigger will show all the files that are recovered. You can restore any file by selecting the file and clicking on ‘Restore selected file(s)’. You can also find specific files by using ‘Search criteria’ tab. Here you can specify name of the file(full or partial) which you want to search. Just click on ’search deleted files once you are through with mentioning file name. Following are the screen shots :
DiskDigger result screen
Screen shot when you click on ‘Search criteria’ tab.
That’s all about recovering your data through DiskDigger. You can also take a look at my earlier post Encrypt your data with free TrueCrypt for encrypting data in hard disk, USB drives.